 English
 Español
 عربى
عربى

Intelligent Threading Machine
1. Automatically identify the pipe diameter 2. Automatic tool adjustment and setting 3. Thread diameters from 15mm to 100mm 4. Threading time as lo...
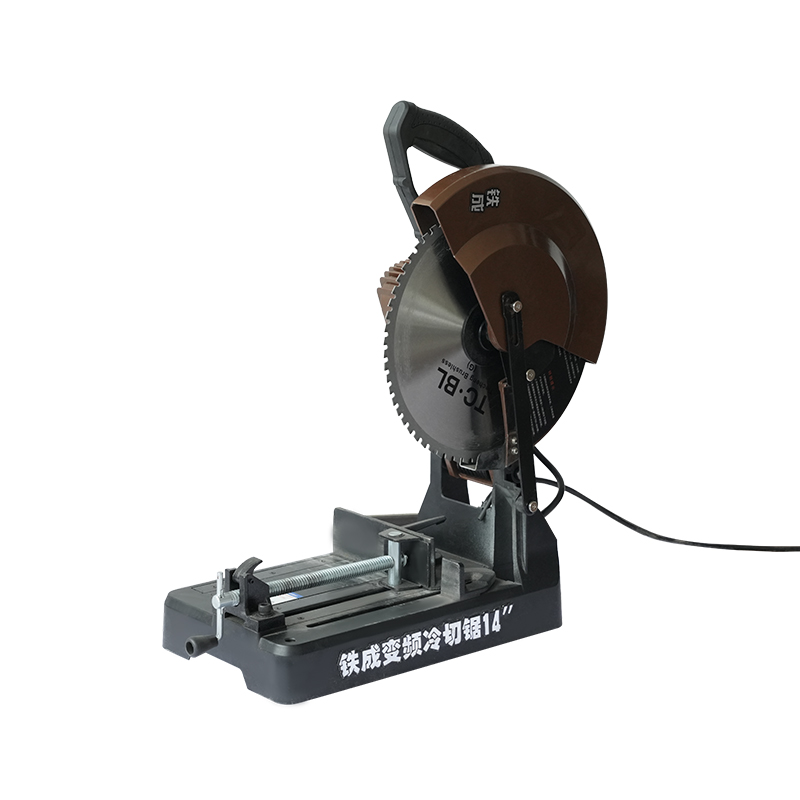
See DetailsA clean, precise, and safe cut on a metal cold cutting saw doesn’t start with the blade—it starts with the workpiece clamp. A workpiece that shifts, vibrates, or “walks” during a cut is more than just an annoyance; it’s a direct threat to cut quality, blade life, and operator safety. A loose piece can bind the blade, shatter carbide teeth, or be violently thrown from the machine.
The goal is simple: to create a rigid, immovable connection between the workpiece and the saw’s bed. Achieving this requires understanding a few fundamental principles and applying them consistently.
Content
Before diving into the “how,” it’s crucial to understand what you’re preventing.
Poor Cut Quality: Movement results in a wavy, rough, or burr-laden cut surface. It can also cause the blade to wander, leading to an out-of-square cut that ruins the dimensional accuracy of your part.
Accelerated Blade Wear: A shifting workpiece causes uneven loading on the blade’s teeth. Instead of each tooth taking a clean, calculated chip, they will rub, scrape, and impact the metal, prematurely dulling the carbide tips.
Safety Hazards: This is the most critical point. A loose workpiece can:
Bind the Blade: This can stall the motor, break the blade, or send sharp metal fragments flying.
Kickback: The saw can violently throw the workpiece back toward the operator at high speed.
Crush Hazards: The saw’s hydraulic clamp exerts immense force; a finger caught between a moving clamp and the workpiece will be seriously injured.
A secure clamp begins with a stable foundation. You cannot properly secure a workpiece if it is not making full contact with the machine’s bed and vise.
Deburr the Ends: If you are cutting a long piece of stock, the ends from previous cuts often have sharp burrs. Use a file or grinder to remove these. A burr on the end of the stock will prevent the workpiece from sitting flat against the fixed vise jaw, causing it to rock and pivot during the clamp cycle.
Check for Straightness and Cleanliness: Inspect the workpiece for any significant bows or twists. Also, ensure the area that will contact the vise jaws and machine bed is free of heavy scale, dirt, and oil. Contaminants can compress under pressure, creating a false sense of security and leading to movement.
The vise is the heart of workpiece security on a cold cut saw. Most modern saws feature a fixed jaw and a moving jaw, operated by a manual lever or a hydraulic/pneumatic cylinder.
Positioning the Workpiece: Place the workpiece firmly against the fixed jaw of the vise. This jaw is your primary reference point for a square cut. The cut line should be positioned just to the outside of the saw blade, ensuring the scrap piece (the “drop”) is on the moving jaw side. This prevents the drop from being pinched by the closing vise after the cut is complete.
Applying Even Pressure: The goal is to clamp the workpiece squarely and firmly. When closing the vise (manually or by activating the clamp), ensure the jaws are making full, parallel contact along the workpiece. Avoid clamping on extreme edges where the vise can cantilever and apply uneven pressure.
Vise Jaw Condition: Check that the vise jaws are not worn or damaged. Serrated or knurled jaws provide excellent grip but can mar soft materials like aluminum. For finished surfaces, use soft jaw inserts made of copper or aluminum.
For certain workpieces, the standard vise alone may not be sufficient. Recognizing these situations is key to advanced workpiece security.
Clamping Unusual Shapes: Round stock (pipe, tubing, solid rounds) has a tendency to rotate. The V-blocks built into most vise jaws are designed to counteract this. Ensure the round stock is seated deep into the “V.” For extra security, especially on large-diameter or thin-walled tubing, use an additional chain clamp or a dedicated pipe clamping accessory if your saw is equipped with one.
Securing Large, Flat Stock: When cutting plate or wide rectangular tubing, the central area of the workpiece can vibrate. Use a C-clamp or a dedicated hold-down clamp on the side of the workpiece opposite the vise, pressing it down firmly onto the saw table. This dampens vibration and prevents “chatter.”
Supporting Long Workpieces: A long, overhanging piece of stock acts like a lever. The force of the cut and the weight of the material can lift the piece out of the vise. Always use roller stands or support tables to bring the outfeed end to the same height as the saw table. This eliminates the lever effect and prevents dangerous sagging or lifting.
How you initiate and complete the cut also influences workpiece stability.
The “Scoring” Pass: For materials prone to chipping or on critical finish cuts, some operators use a light scoring pass. Lower the running blade slowly until it just kisses the top surface of the metal, then retract it. This creates a small groove that helps guide the blade for the final, full-pressure cut, reducing the chance of the blade walking.
Smooth, Consistent Feed Rate: Do not force the blade. A cold cut saw is designed to be fed with a steady, moderate pressure. Forcing the cut overloads the blade, generates excessive heat, and increases the chance of the workpiece shifting. Let the sharp, slow-moving blade do the work. Listen to the sound of the cut; a smooth, consistent hum is ideal. A labored, chattering sound indicates a problem.
Completing the Cut: As the blade nears the end of the cut, be mindful of the drop piece. Ensure it is properly supported so it does not fall and bind the blade or swing down and hit the machine. Do not release the vise clamp until the blade has completely come to a stop and retracted to its home position.
Before you pull the handle to start the cut, perform this quick mental checklist:
Vise Check: Is the workpiece seated against the fixed jaw? Is the vise clamped with firm, even pressure?
Workpiece Support: Are long pieces properly supported on both the infeed and outfeed sides?
Clearance: Is the blade path clear? Is your drop piece going to fall safely?
Clamp Clearance: As you lower the saw head, watch to ensure the clamp, blade guard, and blade will not hit the workpiece or any additional clamps you’ve installed.
Personal Safety: Are safety glasses and hearing protection on? Are gloves off when near the moving blade?
By methodically following these steps—preparing the workpiece, mastering the vise, using supplementary clamping when needed, and employing a controlled cutting technique—you transform your cold cut saw from a simple cutting tool into a precision instrument. The result is not just a perfect cut every time, but a safer, more efficient, and more professional workshop practice.

1. Automatically identify the pipe diameter 2. Automatic tool adjustment and setting 3. Thread diameters from 15mm to 100mm 4. Threading time as lo...
See Details
1. Intelligent adjustment, electric screwing 2. Save labor and improve efficiency 3. The layout is reasonable, safe and reliable 4. Torque adjustable,...
See Details
1. Next generation performance, delivering over 3,500 precise cuts with every blade 2. Intelligent Motor Technology 3. Precision Shadow Line Guide 4. ...
See Details
The F1200 Series Air Compressor is engineered for reliable, cost-effective compressed air supply, core to which are its high-efficiency oil-free desig...
See Details
The F1680 Series Air Compressor is engineered for stable and efficient air supply, featuring core technologies of multi-cylinder compression, rapid ai...
See Details
Specialized Compatibility: Exclusively designed for intelligent threading machines, the dies feature a high precision-machined structure that perfectl...
See Details
Core Material & Performance: Crafted from high-speed steel (HSS), the threading dies feature excellent hardness, wear resistance and heat resistan...
See Details
This SQ65 2.5-inch 15-65mm dual-speed electric pipe threading machine is a professional industrial tool engineered for precise pipe threading operatio...
See Details
This SQ100 4-inch 15-100mm dual-speed electric pipe threading machine is engineered for precise and efficient pipe threading operations, with a workin...
See DetailsCopyright © by Hangzhou Xinabo Intelligent Electromechanical Technology Co., Ltd Rights Reserved. Pipe Threaders Manufacturers
